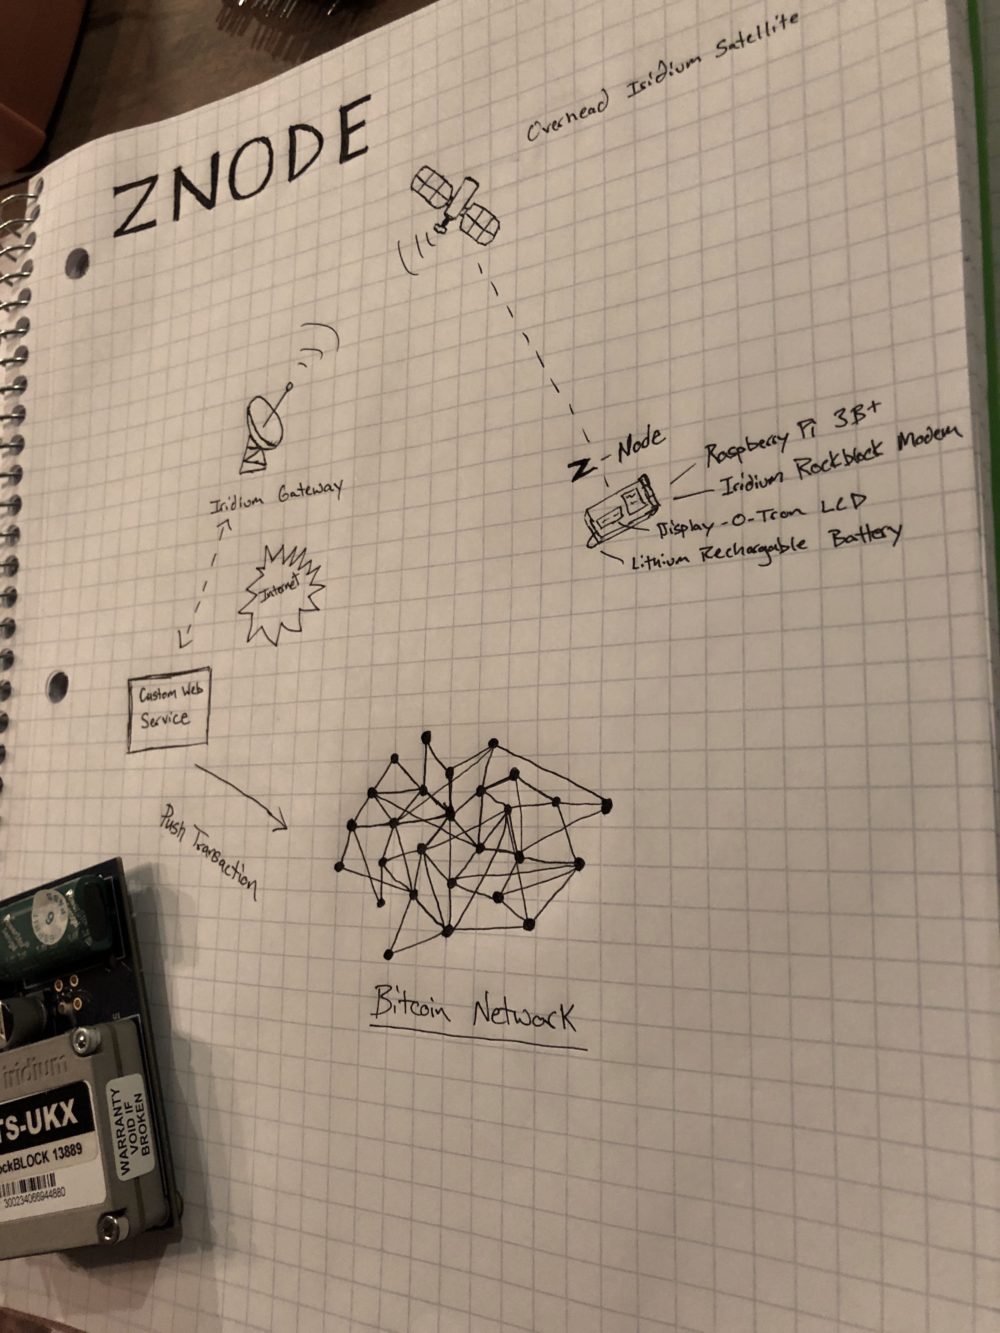
Bitcoin Satellite Node Using Iridium RockBLOCK Mk2
If cellular, WiFi, and the entire power grid go down, I can still send Bitcoin using the Iridium Satellite Network. Totally portable and no dish necessary. 🛰 🛰 🛰
Let’s walk through everything you’ll need to get your very own Satellite Node up and running. If you’re new to the world of Iridium and satellite communication, check out my previous post.
If cellular, WiFi, and the entire power grid go down, I can still send BTC from anywhere in the world with this little guy. Totally portable and no dish necessary. 🛰 🛰 🛰 #Buidl pic.twitter.com/WFyDTRxVwP
— Nick Fogle (@nickfogle) August 27, 2018
What you’ll need.
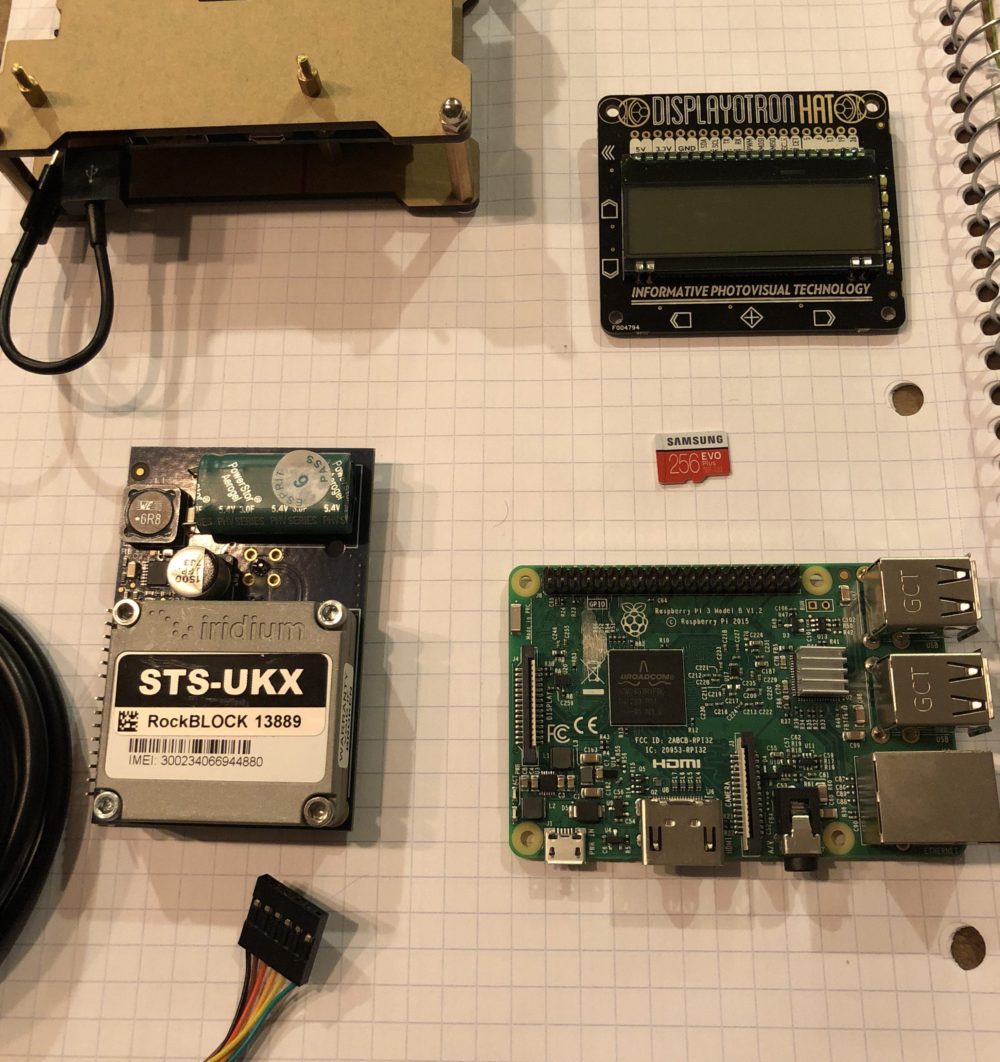
Raspberry Pi – I used the 3B+. An older board will also work if you’ve got one lying around. For this basic use case, the 3B or RPi Zero could offer similar performance and draw less power.
SD Card – You’ll need to flash this with Raspbian or your preferred OS before getting started. Choose a size that meets your anticipated needs. I’m using the 256GB card, because I’ve added my own “Doomsday Archive” to the drive. This includes about 100 GB of ebooks and pdf guides for surviving and rebuilding society without internet access.
RockBLOCK Mk2 – this little device contains an Iridium 9602 transceiver, built-in antenna, and simplified power requirements – everything you’ll need to transmit and receive data from the top of Mt. Everest or middle of the Pacific.
FTDI USB to UART cable – this is the easiest way to connect the RockBLOCK to the RPi. I also found the FTDI USB connection was more stable than when I tried connecting directly via GPIO pins. However, if you’re concerned about form factor, the GPIO pins are your best bet. Just be warned that this can take some trial and error if you haven’t done it before. You’ll also want to reference the handy Pinout tool for the Raspberry Pi.
Display-O-Tron Hat – this is a great little LCD display for the money. Pimorini provides detailed documentation for installation, and there are existing python implementations that we can modify to our suit our needs.
Power Supply – the stand helps keep everything organized and keeps the device running cool once everything is assembled. If you’re hoping for a more flexible form factor, I’m sure a similar 5v 2.5A power supply would work. Just be sure to add a heat sink or fan to keep the device cool.
RockBlock Modem and Power Requirements
I’m not going to go into too much detail on this one. Be sure sure to checkout the developer guide, and you’ll want to keep an eye on power consumption.
At minimum the RockBLOCK needs 100mA @ 5v DC. You’ll probably want to do all of the initial configuration while plugged in to an outlet. Once you have everything working, you’ll want to add some form of mobile power supply. I found it easiest to use an uninterrupted power supply with an on/off switch to quickly test the switch from wall to battery power. Since this was a proof of concept, I just borrowed an old UPS from one of my lightning nodes. After some light field testing, I found that the little lithium battery handles the power demands of the RockBlock with no problem. I was able to get 2-3 hours of moderate use before running out of power. If you’re hunting for the right combination of battery life and form factor, you’ll definitely want to have a voltmeter handy.
Display
In a blackout scenario, you’re going to need some kind of interface for interacting with a wallet, signing transactions, etc… I opted for Pimorini’s Display-o-tron, a lightweight display capable of showing the minimal amount of information you’d need to send a bitcoin transaction. I didn’t care to write my own custom interface code, and Pimorini provides detailed instructions for installing using their python library. The one major drawback is the 16×3 character limit. To view an entire transaction hash, you’ll need to write your own scrolling functionality.
Software
This guide is limited to the hardware and high-level setup of the Satellite Node, so I’ll leave the code and implementation specifics up to you. The details below should get you started.
Node Software
There are a few things you’ll need to do here. First, you’ll want to write the logic for controlling the Iridium modem. There are several open source libraries out there (there’s the well tested C++ Iridium SBD lib, as well as python and node.js libraries). It’s important that you’re somewhat familiar with Iridium Attention Codes. I created a cheat sheet here: Iridium Attention Codes.
Next you’ll need some sort of physical interface to control the device. As I mentioned above, the Display-o-Tron Pi hat is pretty great because you can easily modify the examples Pimorini provides to create your own custom menu and button triggers. The background color is also easily configurable. As you can see, I set up the display to show blue background by default, red for error states, and green for transaction success.

Relay Server
The relay server is important because your transaction will take 2-3 Iridium messages before you have the entire transaction hex. That’s because the RockBLOCK can only send a maximum of 340 bytes per send and 270 bytes per receive. The logic here is simple:
(1) Create an API endpoint to receive the SBD
(2) Write logic for storing and assembling the transaction parts
(3) Push the complete transaction to the network via your own node service or a service like Blockstream
For the proof-of-concept version, I spun up a simple EC2 instance in eu-west-1 to test a remote relay fallback. You should use several servers across different providers and geographic zones for better resilience.